#Convert Raster Images
Explore tagged Tumblr posts
Visit Tumblr Blog
Explore Tumblr blogs with no restrictions, modern design and the best experience.
Last Seen Tumblr Blogs


Fun Fact
Tumblr is available in 18 languages.
Text

Space Suit Vector Tracing
To place your order Click on the link Fiverr: https://www.fiverr.com/s/EgEk1kD
You can also DM or Email Email: [email protected]
Facebook: https://web.facebook.com/emangraphics01/ Instagram: https://www.instagram.com/eman_graphics01/ Dribbble: https://dribbble.com/emanahsan Behance: https://www.behance.net/emangraphics Artstation: https://www.artstation.com/emangraphics4 Pinterest: https://www.pinterest.com/emanahsan990/ BSKY: https://bsky.app/profile/emangraphics.bsky.social VSCO: https://vsco.co/emangraphics/gallery Tumblr: https://www.tumblr.com/blog/eman-graphics
#vectortracing #vectortrace #vectortracingservice #vectordesign #vectorization #vectorized #vector #art #artwork #vectorart #graphic #graphicdesign #graphicdesigner #digitalart #redraw #vectorillustration #digitalilustration #rastertovector #coverttovector #imagetovector #vectorizeimage #lineart #logotracing #logoredraw #vectorlogo #highresolution #adobeillustrator #adobephotoshop #fiverr
#vector tracing#vector trace#vector tracing service#vector design#vectorization#vectorized#vector#art#graphic design#graphic designer#artwork#vector art#graphic#digital art#redraw#vector illustration#digital illustration#raster to vector#convert to vector#image to vector#vectorize image#line art#logo tracing#logo redraw#vector logo#high resolution#adobe illustrator#adobe photoshop#fiverr
2 notes
·
View notes
Text
Enhance Your Designs with Professional Vector Conversion Services from Art Work Lady
Are you looking to take your design projects to the next level? Art Work Lady is here to help you! We are a leading provider of vector conversion services, dedicated to transforming your images into high-quality vector artwork.
Why Choose Art Work Lady for Vector Conversion?
Precision and Perfection: Our skilled team ensures meticulous attention to detail while converting images into vectors, resulting in flawless and precise graphics.
Improved Scalability: Vector conversion allows your designs to be scaled up or down without losing any quality, ensuring they remain visually stunning across various platforms.
Expert Raster to Vector Conversion: We specialize in converting raster images into versatile and editable vector files, giving you the flexibility to modify your designs effortlessly.
Seamless Image to Vector Conversion: Our streamlined conversion process makes it easy for you to convert images into vector format without any hassle.
Enhanced Design Flexibility: Vector artwork provides greater flexibility, making it easier to adapt your designs for various applications like printing, web, and promotional materials.
How does Art Work Lady work?
Submit Your Image: Simply visit our website at http://www.artworklady.com/ and upload your image using our user-friendly interface.
Receive a Quote: Our team will promptly review your image and provide you with a competitive quote for the vector conversion service.
Expert Vector Conversion: Once you approve the quote, our skilled professionals will begin the vector conversion process, ensuring utmost precision.
Review and Delivery: We value your satisfaction, and thus, we allow you to review the vector artwork before finalizing it. Once approved, we deliver the converted files to you promptly.
Improve Your Designs Today!
Don't let raster images hold back your design creativity. Embrace the benefits of vector conversion with Art Work Lady. Our exceptional services will undoubtedly elevate your designs and leave a lasting impression on your audience.
Get Started: Visit our website and experience the power of vector artwork. Let us assist you in converting your images into stunning vector graphics today!
1 note
·
View note
Text
We Are Your Connection With The Creative Mindset

Our Identity: Adroitsquare unique convergence of creative thinking, design acumen, and excellence in shared services. We offer a long-term value proposition of having an extended offshore delivery center that enables our clients to be more competitive, agile, and efficient.
With decades of domain expertise and business insight, we deliver unmatched creative design services for our clients. Our rapidly expanding domain expertise includes newspaper and publishing, custom print products, promotional products, sporting goods, and the automotive industries.
What We Do: We partner with newspapers/magazines, media companies, custom print, and promotional product companies by providing creative digital and graphic design solutions. Besides office supply stores and vehicle wrap companies, we also cater to the sporting goods industries for their embroidery and direct-to-garment designs.
Our domain knowledge and passion for excellence enable us to do more than meet the SLA, which delivers excellent value add to each client we serve.
Our partnership brings significant cost savings, which empower our clients to expand offerings and focus on optimizing operations to delight their customer base. 24/7 operations quickly scale to meet any volume or seasonal demand. We offer a long-term value proposition by having an extensive offshore delivery center that enables our clients to be more competitive, agile, and efficient.
#graphic design#embroidery digitizing#embroidery digitizing service#news page design#newspaper ad design#pagination#vector conversion#raster to vector conversion#convert image to vector#custom vehicle wraps designing#UI design services.#logo design#editorial design#poster#branding#digital illustration#digital art#animation#typography
1 note
·
View note
Text
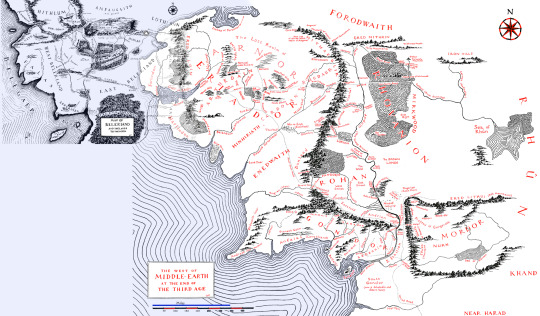
Comparative Sizes of Beleriand and the Lands to the East
I put this together as a resource for my own writing awhile back and at first just stared at it in utter bewilderment. Is Beleriand really this small?! It seems like the answer is yes, and I'll give a quick explanation as to why below.
I've seen various stitched together maps of the First and Second/Third Ages, but the primary ones I've encountered still end up with the distance measurements not quite reflecting what we have in the text or map legends.
Without going into too many of the tedious bits, the basic overview is that I put this together by superimposing the maps in Photoshop, aligning Himring and Tol Himling, then drawing this out till the two iterations of the Ered Luin crossed. The primary thing here was ensuring the distance between Himring/Himling and the Ered Luin remained the same in both places.

There were various other details as well, but the key factor for determining whether this was feasible was to check whether it held up when comparing the numerical distances we are given as well.
This is simplest on the map of Middle-earth in the Third Age, since the official map was kind enough to provide a mileage legend. However, the Beleriand map was not nearly so forthcoming. So off we go to everyone's favorite chapter of the Silmarillion (Of Beleriand and its Realms) where we find that East Beleriand is described as being
at its widest a hundred leagues from Sirion to Gelion and the borders of Ossiriand

If this is 100 leagues, then we can convert that to roughly 345 miles and move that rasterized line down within the same file and line it up with our mileage legend from the map of Third Age Middle-earth (scaled as shown in the first image). Which gives us this:

Almost spot on!
Which, I'm not going to lie, really shocked me. I expected to find that this was wildly off since I've always assumed these maps to be fairly equal in my head. But no, it seems that all the epics of the First Age really did happen in an area no larger than Eriador.
One last image that I find interesting is isolating just Beleriand from this stitched map while retaining the water's tint so you can see the approximate whereabouts of the new shorelines would have ended up.

726 notes
·
View notes
Text
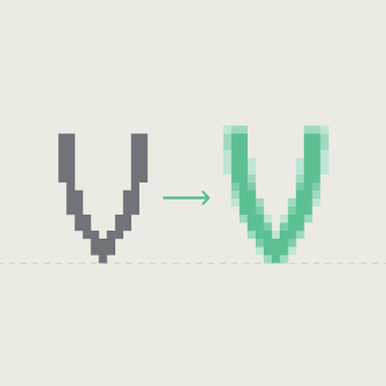
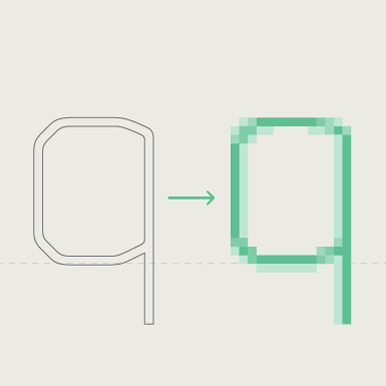
fig. 1 - Anti-aliasing
Semi-transparent pixels along the edges of letterform outlines to smooth jagged edges. Anti-aliasing is usually desirable at large point sizes (16 points or above).
fig. 2 - Rasterization
Converting an image from vector to raster (pixels or dots)
source
30 notes
·
View notes
Note
sorry if you’ve answered something similar before but how do you format things for your website? in the collections you have for poems
i love how it looks. the book kind of format it has
and i want to do similar/the same formatting for my own works but im really struggling…
i've been asked stuff like this a lot and i don't mind explaining it often because i want people to make websites more. i made a tutorial video at some point but it's kind of hard to make a curriculum or tutorial or whatever around this kind of thing because it's really just a self expression thing. i'll try to break down as much of my thought process as makes sense.
i design my pages in photoshop with either double/single page display in mind and then i use html to set them next to each other. most of the choice here comes down to how overwhelming i want my designs to feel. in the case of the lonely leaver page, the entire book was designed to be something that could be a physical book, and so from the getgo i made the pages in that kind of format. i previewed things in acrobat which has a booklet view mode (which singles out the front and back cover around the contents of the file) & allows you to process double page view as well. as for the actual process in photoshop before that point, i typically will open a canvas that is the size of the full 2 page spread (i.e. 8 inches wide for 2 pages which are both 4 inches wide) and i set grid lines for bleed margins and to mark the center of the page so that i can make the composition something that im comfortable with having a gap in the middle from the book folding. with lonely leaver i had to reformat about half the book at some point because i wanted to make it a larger resolution which was annoying but i just keep my guidelines for a print size in mind while im working. often if im a certain amount of time into a project that i feel like i will be spending a lot more time with i'll create a dummy psd file at this point which is devoid of content but which has all of the margins/resolution stuff set up already so i can just open that up and save a different version of it when i'm done.
my actual writing process and my design process is generally extremely intertwined, that's why things tend to be varying degrees stream of conscious in my work i think. i'll for instance, have a thought im stuck on for several days, and then open photoshop without having a poem or comic in mind, but i'll fill the canvas with some kind of color like red or yellow or a photo or whatever, and then open a text box or start drawing. telling a story through composition (i.e. page layout itself) is generally my favorite aspect of art and design because i enjoy how violent and dramatic framing angles can make the content of a piece feel so i'll try to move stuff around as much as possible in order to get my desired effect, often times using place holder shapes in lieu of finished design elements in order to get a rough blocking. as i do this i tend to react to what i'm writing/making as i'm doing it, and i do a lot of selective self editing during this part. for instance, i'll start manipulating rasterized text or cutting around images or whatever. i'll reread and look at whatever im doing for a couple of hours and then when i'm done with a spread or whatever i will save the document as a psd with a combined full spread and then each page separately as pngs or whatever (split at the middle grid line, back to the example, i'll save 2 different 4 inch wide images by changing the canvas size).
when it's time for me to put stuff on my website i then batch convert whatever pngs i exported into webp's because they load faster and take up less space on the server/my computer. you can look at my direct html/css files in your internet browser's explorer mode to see exactly what i do but essentially i just have either 1 or 2 images in a block and then a series of repeating vertical blocks containing images. i don't have an extremely efficient way of uploading pages and i'll typically just copy the same
"<p><img src="01.png"> <p><img src="02.png">"
like, 30 or 40 times or whatever into a html document. i use visual studio code for this stuff because it lets me do a bunch of stuff like having several files open at once & the navigation pane is nice & there's a live server extension that automatically refereshes the html file in my web browser on file save which is really awesome. i have a css page that i made like, 5 years ago, and i usually just link new projects to that because it has a bunch of different settings in it which i'll toggle on or off depending on the needs of whatever page or i'll add new div id's to it. it's kind of messy at this point, but it gets the job done. i use filezilla and something like bluehost or something for webhosting/file management.
i arrange and organize all of my art extremely methodically so usually in my like "<root catch all poetry folder>" inside of my "<root catch all art folder>" there will be a "<name of specific poem book>" folder which just contains the poems named by their actual name e.g. "dedication to saint eulalia 4.png" and then another folder inside of that is called "paginated" where i, using the acrobat document i arrange stuff in as reference, rename copies of my pages which i have placed in that folder to be named things like "01.png" so that i can then manually flip through it sequentially in the windows photo viewer and also just so that i don't have to go through the arduous process of renaming and tracking stuff inside of the root folder i'm containing that project's files in.
i'm 26 now and i made my first website when i was like 18, and my first zine project and i'm tired of feeling feeling around that same time, so i've got like, coming up on a decade of trial and error behind this and this is generally what has worked for me. my website isn't super complicated and mostly just gets the job done but because i try to think about style and presentation up front with whatever projects i'm doing i tend to just make plans based around that as early as it makes sense. to me having a website for art presentation has always been the Primary Method and intended landing zone for my art so it's genuinely always been a consideration in my process to try to plan around how i will put it on my website. i do this because i believe having my own curated space for containing my art allows it to exist in a context which best heightens whatever message i'm trying to convey. if there's an issues with my website right now they are that i'm very bad at mobile browser formatting & i havent updated the main look of the website in something like 4 years barely at all.
anyway, at the end of the day i think really as long as you can identify whatever your intentions are and do some planning/problem solving around that you should probably be able to find your own method which works for you better than mine might but if you do just want to copy my website the tools to do so are within your brain and internet searches and i believe in you. i think the biggest strength of my website is that it shows how easy it is to just put art big as fuck on a webpage and how effective that kind of minimalism can be. i just want my website to be like a museum's walls. and it's not super complicated to get to that level of html knowledge.
11 notes
·
View notes
Note
wait so colors! on the ds isnt rasterized image editing? its vector?<- assuming this based on the exporting thing. if its all raster, i wonder what interpolation it uses to resize up...
Nope! All rasters! I believe colors! image resolution is 512×384 (smallest export size, but twice the size of ds' 256×192!) So yeah, some kind of interpolation for the larger sizes..
It takes a hot minute converting the file to a png on the smallest size as well. Must be difficult for the ds to do file conversions... or maybe my R4 card or SD card is just a bit crappy!
8 notes
·
View notes
Text
youtube
Hi everybody! This time, I would create another 2D post-processing filter that could be useful if, for example, we want to display a newspaper article with a color image in our game, which should look like it was printed on an inkjet printer. In other words, we'll convert the image into a four-color raster in CMYK coding.
#youtube#devlog#gamedev#godot engine#blender#indiedev#game development#indiegamedev#video games#programming#shaders
10 notes
·
View notes
Text

Raster to Vector Conversion Convert all types of raster images such as JPG,PNG,BMP etc. to vector formats AI, EPS, SVG,PDF etc.
#logo#logo design#graphic design#my logo#creative logo#logotype#long reads#creative design#lol#design
2 notes
·
View notes
Text
hello and welcome to my hasty tutorial! it's on private now but i really should clean this up and post this method public & on clip lol so i'll do that later
anyway for brush & pattern making it doesn't matter what size your canvas is, just that it is big enough to draw on and is set to greyscale. I made a bigger canvas than my ribbon:
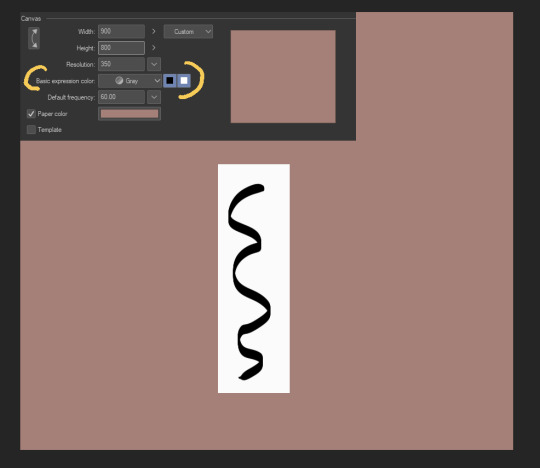
I made a white rectangle where I should draw my repeating object, then drew on that white rectangle in black. This is all on one layer - we'll be separating the lineart it from the background in a bit.
Next, I cut somewhere around the middle:
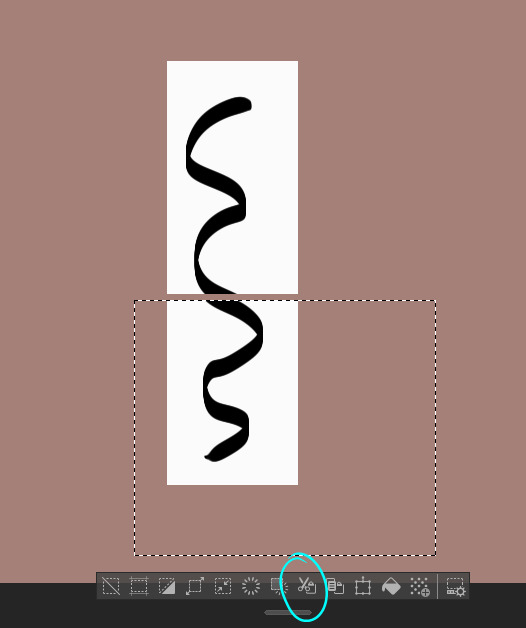
Then, I move.

I use the white rectangle part to align, then merge the two.
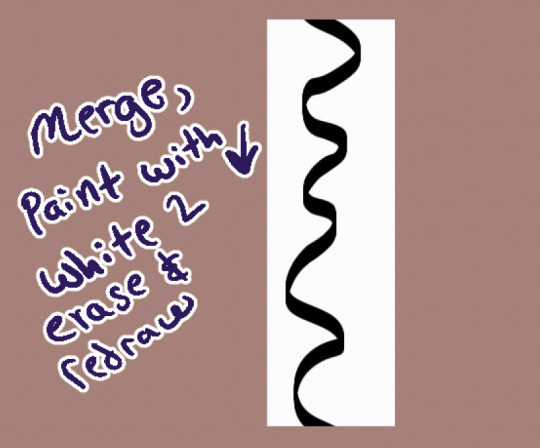
I use white as an eraser & redraw it. You can also make a bigger space between the two and then draw more in between like this:
Whatever you do, the upper and lower parts will connect as long as you properly realign the white rectangle you drew them on. :D
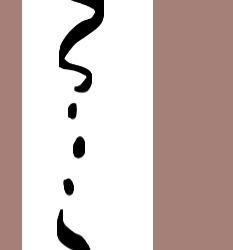
Now that we have our shape connected, let's get rid of the background. Go to Edit > Convert Brightness to Opacity & wham, your white background is gone!
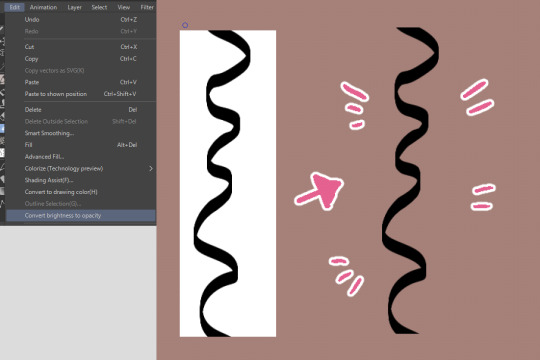
This function was created to get scanned-in lineart done traditionally onto its own separate layer, but can be surprisingly used for other neat tricks like this.
From here you would register the material if you're confident it repeats. If you're not, you can test it like so:
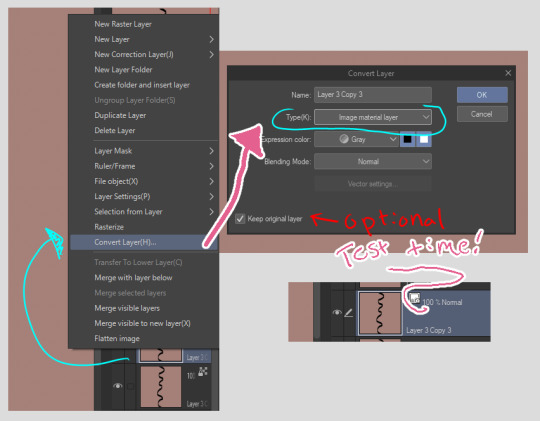
First, right click the layer. Then, convert it into image material layer so it is an object.
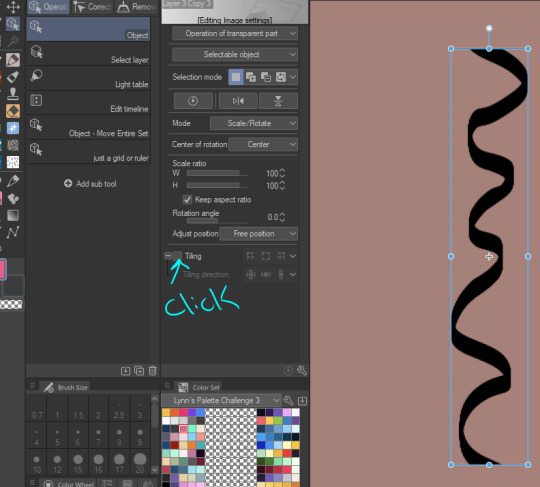
After you made it an object, you can click on the object tool to manipulate it. My icon set is very werid because I've customized my layout and have 40023043204.9 billion brushes I've been playing with, but you'll find it up top somewhere I think. We click on "tiling"...

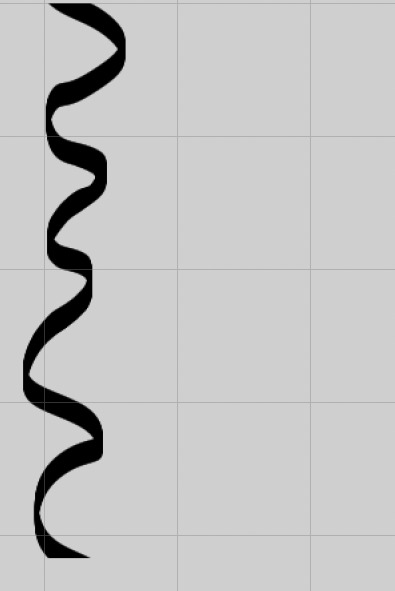
Aww yeah. Success. It works.
You wouldn't register the "image material layer", you'd register the original raster layer you drew it on. If you want to only use vector lines for the whole process, my suggestion is to use the grid tool instead - customize it so it aligns with the top & bottom of your object, then do the same thing we did but with the grid as your actual white box.
This isn't the right size, but the idea would be to make the grid, draw so everything is located within a certain amount of squares in the grid, copy the layer (so you have the original in case something goes wrong) and move the copy around so it re-aligns with the grid.
bonus:
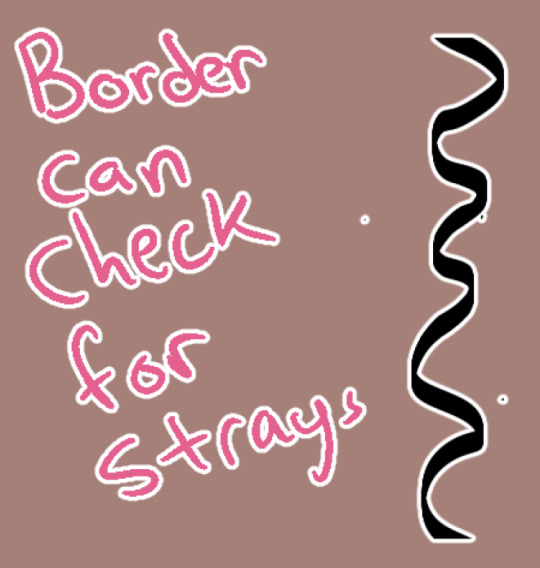
Occasionally I wonder why something isn't repeating. Sometimes it is because there's some stray pixels somewhere that I forgot to erase or left by the brush. You can use the border function to check this & erase them. :D
2 notes
·
View notes
Text
vectorizer.ai (guidady.com)
Vectorizer.ai is a powerful tool that can convert any raster image into a vector graphic. It preserves the colors and details of the original image, and allows you to edit and scale it without losing quality.


2 notes
·
View notes
Text

Cat in Box Vector Tracing
To place your order Click on the link Fiverr: https://www.fiverr.com/s/EgEk1kD
You can also DM or Email Email: [email protected]
Facebook: https://web.facebook.com/emangraphics01/ Instagram: https://www.instagram.com/eman_graphics01/ Dribbble: https://dribbble.com/emanahsan Behance: https://www.behance.net/emangraphics Artstation: https://www.artstation.com/emangraphics4 Pinterest: https://www.pinterest.com/emanahsan990/ BSKY: https://bsky.app/profile/emangraphics.bsky.social VSCO: https://vsco.co/emangraphics/gallery Tumblr: https://www.tumblr.com/blog/eman-graphics
#vectortracing #vectortrace #vectortracingservice #vectordesign #vectorization #vectorized #vector #art #artwork #vectorart #graphic #graphicdesign #graphicdesigner #digitalart #redraw #vectorillustration #digitalilustration #rastertovector #coverttovector #imagetovector #vectorizeimage #lineart #logotracing #logoredraw #vectorlogo #highresolution #adobeillustrator #adobephotoshop #fiverr
#vector tracing#vector trace#vector tracing sevices#vector design#vectorization#vectorized#vector#art#artwork#vector art#graphic#graphic design#graphic designer#digital art#redraw#vector illustration#digital illustration#raster to vector#convert to vector#image to vector#vectorize image#lien art#logo tracing#logo redraw#vector logo#high reslution#adobe illustrator#adobe photoshop#fiverr
0 notes
Text
I get why PDFs are so popular. They can be read basically anywhere, they allow form fills, the can be loaded with image and text layers, a mix of rasterized and vectorized data, they can support search, in document links, ect. Unrelated, but they are a nightmare complication of XML so unabashedly unloved that there are only two main PHP libraries for navigating them.
But it's also really maddening the number of comic book houses that put out PDF copies of their work that are just image files in a pdf wrapper.
It's really obvious when you're someone ridiculous enough to convert them into an image archive format and notice that a poorly made PDF is often 1/10th the size as a CBZ, but a well made PDF is 10x the size as a CBZ.
That's kind of how rasterizing vector formats is supposed to work out. Bigger files with less ability to zoom. If I can minimize the file with a combination of PNG and ZIP compression, you've done something very wrong.
But to add to this, is that a PDF full of PNG or other lossless format comic panels SHOULD compress super well, it's a waste of the format, but it should. But if you then shove it full of low quality jpegs, then the PNG can't really compress the color data and you get a ballooned file.
It's just a whole thing. Basically, you can't predict how big a CBZ of a PDF is going to be. If it's a relative small pdf full of layers and text, it will probably be big. If it's a comic who knows!
2 notes
·
View notes
Text
The Art of Conversion: Transforming Raster Images into Vector Graphics in Illustrator
Vectorization in Illustrator: Common Questions Answered
1. What is vectorization in Adobe Illustrator, and how does it differ from rasterization?
Vectorization in Adobe Illustrator refers to converting raster images (composed of pixels) into vector graphics, which are made up of paths defined by mathematical formulas. This allows for infinite scaling without loss of quality. In contrast, rasterization is the process of converting vector graphics into raster images, resulting in fixed resolution and potential quality loss when scaled.
2. What are the emerging techniques in vectorization that are expected to gain popularity among designers using Illustrator in 2024?
In 2024, emerging vectorization techniques for Adobe Illustrator include AI-powered tools for automatic tracing and simplification, enhanced live shapes for easier manipulation, and improved path-finding algorithms for cleaner designs. Additionally, integration with 3D modeling and augmented reality features is expected to gain traction, allowing designers to create more dynamic and interactive vector graphics.
3. What are the steps to convert a raster image to a vector graphic using the Image Trace feature in Illustrator?
1. Open Adobe Illustrator and import your raster image. 2. Select the image with the Selection Tool. 3. Go to the top menu and click on "Window," then select "Image Trace." 4. In the Image Trace panel, choose a preset or adjust settings. 5. Click "Trace" to convert the image. 6. Once satisfied, click "Expand" to finalize the vector graphic.
4. What are some common challenges faced when vectorizing images in Illustrator, and how can they be overcome?
Common challenges when vectorizing images in Illustrator include loss of detail, complex shapes, and color matching. To overcome these, use the Image Trace tool with appropriate settings, adjust paths manually for precision, and simplify complex areas. Additionally, experimenting with tracing presets and fine-tuning settings can help achieve better results. Always preview changes to ensure desired output.
5. How does the use of layers and paths in Illustrator enhance the process of editing and refining vectorized images?
Layers in Illustrator allow for organized management of different elements, making it easy to isolate and edit specific parts of an image without affecting others. Paths define the shapes and outlines, enabling precise adjustments to curves and lines. Together, they enhance workflow efficiency, enabling quick edits, refinements, and experiments while maintaining the integrity of the overall design.

Visit: VS Website See: VS Portfolio
0 notes
Text
Professional CAD Conversion Services to Transform Your Legacy Data

At Shalin Designs, we specialize in high-quality CAD conversion services tailored to modernize your outdated or paper-based engineering drawings. Whether you’re a manufacturer, architect, contractor, or designer, our expert team converts your hand-drawn sketches, blueprints, or scanned images into precise, editable CAD files — giving you more control, better accuracy, and improved productivity.
Why CAD Conversion Matters for Your Business
Many companies still rely on legacy data stored as paper drawings or raster images. These formats can be hard to manage, edit, or replicate. With CAD conversion, you can:
Digitize old designs for long-term storage
Update and reuse legacy files with modern CAD software
Eliminate risks of data loss or damage
Improve collaboration with editable, standardized formats
Our goal is to help you bridge the gap between old and new technologies while ensuring accuracy, compliance, and efficiency in your design workflows.
Our CAD Conversion Services
We offer a full suite of CAD conversion services for multiple industries. No matter the size or complexity of your project, Shalin Designs delivers quick, precise, and cost-effective results.
1. Paper to CAD Conversion (P2C)
Convert hand-drawn paper sketches, schematics, or blueprints into editable CAD files (DWG, DXF, etc.). Ideal for architects, civil engineers, and construction professionals.
2. PDF to CAD Conversion
We extract vector-based data from PDFs and convert it into 100% accurate CAD drawings. Our drafters ensure correct scaling, layers, dimensioning, and technical accuracy.
3. Image to CAD Conversion (Raster to Vector)
Turn raster images (JPG, PNG, TIFF) into editable vector files. We use manual redrawing to avoid common issues with auto-tracing and maintain high precision.
4. 2D to 3D CAD Conversion
Looking to upgrade your 2D drawings into 3D models? We can transform flat layouts into detailed 3D CAD models for simulation, rendering, or production.
5. Legacy CAD File Conversion
Have files in outdated formats like MicroStation, IGES, or Solid Edge? We convert them into your preferred modern CAD formats, including AutoCAD, SolidWorks, Revit, and Inventor.
Get Started with Shalin Designs Today
Looking to upgrade your old drawings or need CAD conversions for your next project? Shalin Designs is your trusted partner. We’ve helped clients across the USA and globally modernize their design files for easier collaboration and increased productivity.
👉 Get a free quote now or contact us to discuss your CAD conversion needs.
#cad conversion services USA#paper to cad conversion#pdf to cad drafting services#raster to vector cad conversion#image to cad conversion#2D to 3D cad conversion#architectural cad conversion#mechanical cad conversion#cad digitization services
0 notes
Note
do you have any raw .drw files? how does its file size compare to a vector image / raster image of the same size / similar content? like ik vector files can be very small compared to a jpeg... storing timing info sounds simple to implement, but i wonder if it bloats up .drw file sizes?
Oooh, good question, and my answer uhh... got a little out of hand..
Here's the files in the folder for one of my drawings on the windows beta:

So we have the .drw file, the .sim file, a .csv file (this stores text data for my added title and description), and a .png and .sim for the thumbnail.
The .sim file is new to me, but looking at other files I believe the .sim files holds the individual layer data. Maybe the .sim stores the actual image data for display during drawing?
For example, heres the files for my haunter painting:

And here are the layers for the drawing in game (software?):

The sizes match up pretty well with the actual data on each layer!
(I should mention here that looking at file types and figuring out how they work is completely new to me so I could be getting some things wrong. I'm debating if I should reach out to the dev directly to check my work before starting this essay proper... but it's also been fun for me and my brain to try and figure this stuff out on my own)
Actually.. the sim files made me curious... if the main data is in the .drw file, what would happen if I delete the .sim files? Would the file still work?

First off, the thumbnail does not load, but the file still opens fine and the replay function still works.

And we still got all the layers no problem.

Hmm, if I save changes to the images, will it create .sim files?


It did! Huh!
Then uhh.. I don't really know what the .sim files do. If has something to do with display in game which is why the thumbnail didn't display. But I don't know where the layer files would be displaying if it's all based on the .drw. Maybe it's for file conversion? For uploading to the gallery? I don't know...
Anyways... back to the topic at hand, files sizes! The windows beta lets you export files as layered .psd files, .png files, and partial replay in uncompressed and compressed .avi!
So a quick reminder, here are the file sizes of the original image set up for Colors Live:

The .drw is pretty small!!
And here are my exports!:

The .drw is MINUSCULE compared to the .psd. And the .sim size falls between the two sizes of .png. Hmm, still don't know what's going on with that. Also for fun we can look at the size of an uncompressed two minute long .avi looks like. 4 million kilobytes, yay ^_^
Vector wise.. I'm actually not super familiar with vector programs (should probably brush up on them for this essay, huh?) so I'm not sure what exactly is comparable... I've had to use Illustrator this semester but I feel like Colors and Illustrator are approaching vector graphics in a very different way. Illustrator is saving data for vector objects, but Colors is saving data for brush strokes!
Well.. anyway we can open up one of my projects:

And we can stretch that layers panel all the way out so you can see all my layers and paths and objects:

And let's check the file size...

Yep! Pretty small!
For fun we can also convert that .psd I made into a .ai..

Yep! It's smaller!
Regarding file bloat... I think the devs did a fantastic job creating such a small file size and it's perfect for drawing on game consoles that usually have very limited space! However, my experience with Colors! 3D as a kid did have issues with file sizes.. Colors! was the biggest app on my 3DS and I constantly had to juggle uninstalling games and uploading and deleting paintings so I would have more room for new paintings. I did have quite a number of painting files... in various states of progress (as is typical) but storage space was a real issue for me. Now, were my SD cards only 2 or 4 gb big? Yes. Did I understand at the time that those were quite small for SD cards, even at the time? No. Does my experience mean anything then? I don't know.
Colors! 3D also had an issue were particularly lengthy paintings (were talking hitting the ~4 hour mark) would stop saving replay data. The replay would only play up until a certain point. I'm not sure why that is, based on what we know about .drw files I don't think it can be a limitation with the file type? That's kinda all it does? Maybe it's a limitation with the size of the 3DS memory that couldn't play the replays that long? Hitting that ~4 hour mark would also limit the amount of undos you were able to do so it could easily have to do with memory.
(Bit off tangent but undos take soooo long in Colors. And the more undos you do the longer they take! Colors didn't official start limiting the players undos until that ~4 hour mark but they were already limited by your patience)
Anyways, I will leave you with this, a link to the documentation of the .drw file format. It's only two and half pages long which I think is pretty short? Maybe you can find more info in there that what I can parse...
2 notes
·
View notes